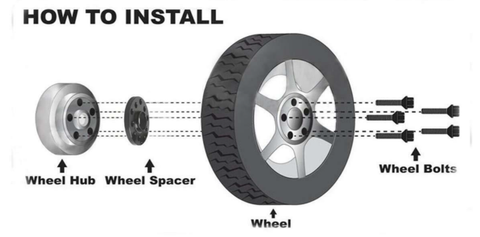
A set of wheel spacers will enhance the performance and appearance of your vehicle. If you are searching for safety-guaranteed wheel spacers, please stop you step. KSP Performance is a solution. This article will show you how to install wheel spacers correctly.
How to Fasten Bolts and Lug Nuts
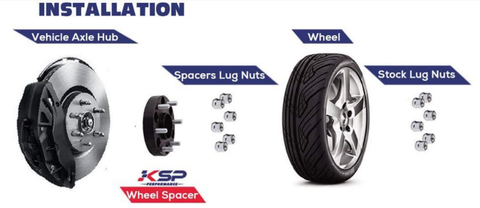
It looks complicated, right? But in fact there is nothing particularly technical, all you should do is following our instructions step by step. Depending on the method of fastening the hub, the vehicle can be divided into two categories: bolt fastening and lug nut fastening. In fact, the installation are similar. KSP will explain the installation method of the lug nut fastening.
You will need to prepare:
- Jack
- Jack Stand
- Torque spanner
- Loctite
- Wire Brush
Pre-installation Preparation
Step 1: Parking your vehicle on a level surface
Step 2: Never work on a raised vehicle that is supported with a factory gemergency, floor or bottle jack. They cannot replace jack stands, what’s more, they are unstable and dangerous!
Step 3: If your vehicle is equipped with air suspension, remember to switch on Jack Mode.
We don’t want your suspension to raise and lower itself to keep leveling while you're attempting to lift one or more corners with a jack. That could cause a catastrophic failure of the jacking process, and cause possible serious damage to the car, and / or injury to the person doing the jacking.
Although this is a small probability event, for the safety of both your vehicle and people, please make sure to turn on the jack mode.
Loosen the Lug Nuts
Common mistake: the first step should be loosening the lug nuts rather than jacking up the vehicle. That’s because you cannot get enough torque on a wheel suspended in the air. So make sure loosening all the wheel lug nuts in turn with a spanner before jacking up the vehicle.
Notification: Just Loosen them, there is no need to unscrew them completely.
Jack up the Vehicle, Remove the Wheels
Jack up and support the vehicle on the Jack stand, then remove the jack. Finally, remove all nuts and take away the wheels.
Clean up the Hub
Clean gunk wire brush, put some Loctite on the hub and thread pitch. Avoid collision to the main part and install the wheel spacers to the vehicle.

Installing the Wheel Spacers
Install the wheel spacers, but use the supplied lug nuts instead of the stock lug nuts. Place the wheel spacer on the studs of the hub. Make sure the studs of wheel spacers face outwards. Later, install the supplied lug nut in a star sequence.
Notification:
- Fix thelugnuts in a diagonal/star pattern in sequence. This will ensure a reliable installation.
- Do notuse Impact Wrench during installation! It may cause damage to both the vehicle and the product!
- Please check the exact torque from theinstructions,
- To prevent loose, thread adhesive(loctite)can be added during installation.
Check the Installation
Failure to clean up may cause a gap between the wheel spacer and the hub, which may allow a vibration of vehicle while driving.
Place the spacer on the factory hub. The spacer should sit flush with the brake rotor. If there is any gap between the brake rotor and the spacer, even if it is small. Don’t use the spacer! Please be sure to check this. You shouldn’t even be able to slide a piece of paper the spacer on the factory hub.
Reinstalling the Wheels
Install the wheels to the wheel spacers. Please note that the wheel lug nuts should be fitted in the same way as the wheel spacers lug nuts ---- tighten the lug nuts in diagonal or star sequence.
Again it is not necessary to fully fit the nuts in place for this step, just keep them for the next step.
Notification: Fix in the order in which the pentagrams are drawn. In the case of six or more holes, fix them roughly in diagonal order.
Removing the Jack Stands
Now you can safely raise the vehicle off the jack stands with the car jack, remove the jack stands, and lower the vehicle.
Finally, torque the stock lug nuts on the wheels using the manufacturer’s torque specs. Again, make sure that you use a star pattern when torquing the wheels. Otherwise, you will risk having improperly torqued wheels.
Notification: KSP has repeatedly stressed the importance of installing the lug nuts in a sequence of drawing pentagram. This is to avoid the hub shifting when tightening, which may lead to misalignment of wheel spacers and the breakage of bolt. And the one we least expect to happen, is damage to hubs.

Follow-up Inspection
Once everything is in place, drive the vehicle and check for any unusual vibration.
Congratulations on the new look of your vehicle! But don't forget about regular maintenance.
Re-torque all lug nuts after 50-100 miles of driving ,then again after 2000-3000 miles.
Don't mind the inconvenience, it's the best way to ensure you have a vehicle that will stay with you for a long time.

